Sunday, December 15, 2013

UPDATED: Converting Magic Lantern MLV files to RAW on OSX

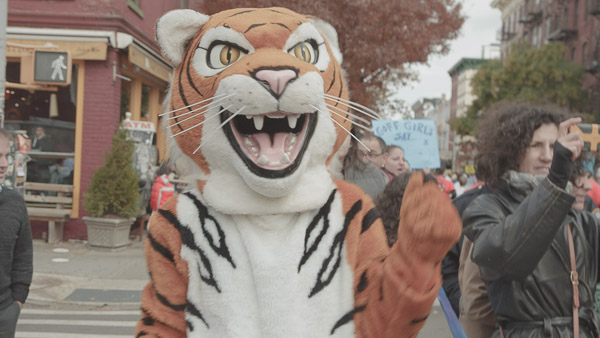
Enjoy this tiger at the 2013 New York Marathon from a video I'm cutting.
UDATE: Check out this solution for directly converting MLV to cDNG or DNG.

I've had some difficulty converting files from the latest Magic Lantern raw video format (MLV) into something that I can post-process (like DNG or cDNG files) on my Mac.

After working on it a month or so ago, I gave up and eventually installed windows via VMWare Fusion so that I could get mlv_dump working. I was successful in windows and was able to mass convert a bunch of footage into RAW files which was compatible with my workflow (currently using RAWMagic on OSX, etc.).

Well, somewhere a few weeks ago I deleted my VMWare Fusion partition and lost the notes I had on the windows box detailing how to do the conversion. I didn't want to go through the trouble of installing windows again so I gave another stab at converting MLV files on OSX… and I got it to work!

So I want to share my findings, both for my future self, as well as anyone else out there using the new format with OSX.

First off, download the pre-compiled binary that user marekk has generously posted on the Magic Lantern forum from his Dropbox: https://www.dropbox.com/s/497bvdlcsd7p160/mlv_dump.zip

I copied this file into the same directory as my MLV files and unzipped it.

Open a Terminal window and cd into the folder where you have your MLV files (and now mlv_dump).

Drag the (unzipped) mlv_dump file from Finder into the Terminal window and add the following text:

-o outputfilename.RAW -r mlvfilename.MLV


So now you should have something like the following in your Terminal window:

<path for your MLV files>/mlv_dump -o outputfilename.RAW -r mlvfilename.MLV


Of course, replace outputfilename.RAW with whatever name you want to call the RAW file to be generated. And replace mlvfilename.MLV with the name of the MLV file that your camera produced.

Once you hit Enter, it should start processing and you'll get a RAW file. Voila! Continue your workflow from there.

Hope this helps folks to ease the transition to using MLV.

If someone savvier than me with OSX can think of a method to batch process a bunch of MLV files into RAW, please let me know! Leave a comment below, thanks!

Saturday, September 14, 2013

Online dating profile photos for single women in New York

Earlier this year I put together a new concept where I merged my photography business with dating. For years I've casually given dating advice to my close female friends. I noticed over time that the ones that put my advice to use, pretty much always got the guy. I didn't think much of it, and I was happy to help. I just knew exactly what their date or beau was thinking and why he was acting the way he did. After a dozen years of dating in New York, I knew how the process worked, especially with online dating.

Now I use my experience as a commercial photographer to light and pose women, using the best tools and techniques available, to make advertisement-quality imagery. After all, dating is all about advertising yourself in the best manner possible.

This kind of photography is all about the right posing, so it doesn't matter if you use Match.com or OKCupid or jDate. The fact is that people are nervous when in front of the lens, so I like to coach them into the right expressions and body language.

After working with fashion models, I noticed that they use special expressions to make their faces look good on camera. If we made a silly post-work group photo, the girls would look really normal - like any photo you see on Facebook. But when they're working, they change their face in a particular way to achieve the "look."

When I asked them about it, they couldn't explain to me how they did it. They just would tell me that you need to practice. I asked Tyra Banks about it when we interviewed her for her iPhone app. She tries to explain it also, but can only describe it in the broadest of terms ("Smile with your eyes! Smize!").

Tyra Banks with my buddy Todd

So I decided I just needed to crack the code myself. I took careful note and eventually was able to explain and share their modeling secrets with my headshot and portrait clients.

Now my clients love my posing tricks, including one simple one anyone can use anytime. If you remember the things I coach you on, the result is that you'll never take a bad picture again. I also like to do a facial analysis and determine if you have an eye difference (most people do), and we figure out which side is your "good" side.

So, anyone can put someone in front of their camera and shoot a photo and call it good. And usually photographers that work with models can't articulate exactly what they want you to do, they just rely on the model to work her magic. If a shoot doesn't come out that well, they just grumble about the model and how they need a better one for next time.

Well, I don't believe that people are born photogenic or not. I think that anyone can work their own magic with the techniques I teach them. And if I can help some women in the competitive dating world in New York, I'll be very satisfied.

Friday, August 2, 2013

Compressing Magic Lantern RAW video Part II


I shot a candlelight test with the Mark 3 (finally got it back from service) and the Mark 2 and decided to test the file sizes again.

Mark 3 footage uncompressed: 100.22GB
Mark 3 footage lossless compressed: 55.82GB (44% reduction in size)
Mark 3 footage loss compressed: 22.63GB (77% reduction in size)

Mark 2 footage uncompressed: 47.15GB
Mark 2 footage lossless compressed: 29.56GB (37% reduction in size)
Mark 2 footage lossy compressed: 16.53GB (65% reduction in size)

Pretty significant savings, even with the lossless compression. Since I haven't finished editing this one, I think I'll keep the lossless compressed around until I finish. Then chuck it and keep just the lossy compressed files.

Above is a frame from the test. Lit purely by candlelight!

Wednesday, July 17, 2013

Compressing Canon 5D RAW Video to Save Space

I decided to compress my raw video footage to save hard drive space. It was always in the plan, but I've been too busy shooting for the past two weeks. So last night I finally had some time to try it.

I took a folder with about 32 minutes of footage (it was about 47,400 frames, at 24p that is about 32 minutes). At the varying resolutions I've been shooting the 5D Mark II at, finder told me that the folder size was 113GB. I fired up Adobe DNG Converter and told it to compress all of those DNG files using lossy compression, no embedded preview, no fast load data, etc. I believe my settings make for the tightest compression possible while preserving pixel count:


I let it run overnight and I compared the file size this morning. WOW, what a difference. The file size dropped from 113GB to less than 30GB. That's an over 70% reduction in size.

I know some guys will say not to use Lossy compression, but I would bet those fellows are probably amateurs or come from a stills photography background, or both. They will for sure say something like, "Hard drive space is cheap, keep the data!" But in reality hard drive space is not that cheap unless you buy the cheapest consumer drives and have room in your computer or a sufficient number of fast external ports for external drives.

In the world of moving pictures, the use of lossy DNG compression will not affect the end result at all. And a 73% reduction in storage requirement is significant.

Agree? Disagree? Let me know in the comments below!

Friday, July 12, 2013

Canon 5D High ISO RAW Video

I shot this for a client on Monday, using mostly ISO1600 and sometimes 3200 (the dog in sun was ISO100). The consequence was that I barely had to light it, and I could really run and gun, focusing my attention on content and pulling focus. Some of the footage has been pushed +1.0 to +1.6 stops of exposure in post (ACR) to match brightness levels from clip to clip. The post production cost is higher than shooting H264 though... I estimate for a short video like this, to add 1 to 1.5 days. With my workflow, that's the time to convert raw files to DNGs and adjust them, and also the time at the end to do color corrections and other raw adjustments and re-encode ProRes files.

The lesson learned here, for me, is that I can shoot at ISO1600 with impunity, and probably 3200 too. In post, I couldn't tell them apart. Can't wait to try with the 5D Mark III next to see if it's that much better. These are exciting times indeed. Arri Alexa eat your heart out!


Rare Breed Gourmet Dog Treats from John Ha on Vimeo.

Tuesday, July 2, 2013

Magic Lantern raw video test results on 5D Mark II


Lucy RAW test from John Ha on Vimeo.


I've been testing the Magic Lantern raw video capability on my 5D Mark 2 and 5D Mark 3 cameras. Well, I first tried loading it onto the Mark 3 and promptly bricked it. Oops, that's going back to Canon for repair.

So then I loaded it on my Mark 2 and it's been working fine. I installed the June 29th nightly build.

On the Mark 2 currently, here are my findings for shooting resolution (for 16:9 aspect ratio and 23.976 frame rate override, 180 degree shutter equivalent):

1880x1058 is the max resolution for the 5D2 and even with my Sandisk Extreme Pro 90MB/s card, I can only record for a limited time (maybe 1000 or 1500 frames).

At 1728x972, I can record continuously with my Extreme Pro 90MB/s card, but not with my Extreme 60MB/s card.

At 1600x900, I can get about 1500 frames out of the slower 60MB/s card. And of course continuous recording with the faster card.

At 1472x828, I can get continuous recording with the slower Sandisk Extreme 60MB/s card. I'm using the 64GB version and I estimate I can record about 22minutes of footage on that card.

At 1280x720, I estimate I can get about 28 minutes of footage on that slower 64GB card.

This is great news. I've seen tests comparing 720p raw vs 1080 H.264 and the 720p raw wins. So I think if you want to shoot raw on a job and don't want to buy or rent the faster 1000x cards (which are pretty expensive right now), this is a great compromise.

I am going to do a test of shooting the Mark 2 at 1472x828 and at 1280x720 and then uprezzing the files to 1080p.

Currently, the limiting factor of shooting these cameras using Magic Lantern raw at 1080p resolution is not the camera, but the acquisition media costs. The reliable 1000x 128GB cards go for $600-700, and you will need at least 2 or 3 for a job. At full resolution, you get about 25 minutes of footage per 128GB card. That is a pretty steep price. Of course you could rent the cards, and for a job that is probably a good idea.

But a good compromise at a lower production cost could be to shoot at 720p or 750p or 820p.

I will run some tests and post the results later. In the meantime I hope you enjoy the Lola and Lucy video above, shot in RAW on the 5D2.