Showing posts with label 5d. Show all posts

Monday, December 16, 2013

Converting MLV files to DNG on OSX

Enjoy this running french bulldog while you read the post below.
I previously posted about my experience with converting MLV files to RAW for post processing on a Mac. Well, shortly thereafter I got a bit of help and was able to figure out how to convert directly from MLV to DNG or cDNG. I hope this process helps to spur the adoption of MLV amongst Mac users.

Solution:

Thanks to the generosity of Danne and g3gg0 over on the Magic Lantern forum, I got the correct syntax to convert MLV files directly into DNG sequences without making an intermediate RAW file.

From this thread: http://www.magiclantern.fm/forum/index.php?topic=9573

Here is the syntax:

1. don't use spaces
2. first cd into a directory ("cd  <directory>" and note the SPACE after cd)
3. then execute "./mlv_dump --dng <filename>" (ENTER THE FILENAME MANUALLY WITHOUT ANY PATH)

And whaddaya know, it works beautifully! Now I just need to find a way to batch everything so I can run the command on a folder with several MLV files in it.

Sunday, December 15, 2013

UPDATED: Converting Magic Lantern MLV files to RAW on OSX

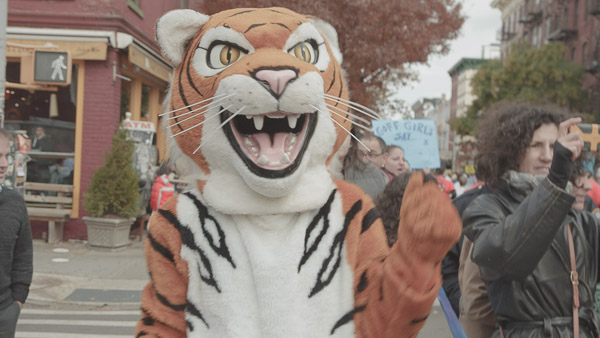
Enjoy this tiger at the 2013 New York Marathon from a video I'm cutting.
UDATE: Check out this solution for directly converting MLV to cDNG or DNG.

I've had some difficulty converting files from the latest Magic Lantern raw video format (MLV) into something that I can post-process (like DNG or cDNG files) on my Mac.

After working on it a month or so ago, I gave up and eventually installed windows via VMWare Fusion so that I could get mlv_dump working. I was successful in windows and was able to mass convert a bunch of footage into RAW files which was compatible with my workflow (currently using RAWMagic on OSX, etc.).

Well, somewhere a few weeks ago I deleted my VMWare Fusion partition and lost the notes I had on the windows box detailing how to do the conversion. I didn't want to go through the trouble of installing windows again so I gave another stab at converting MLV files on OSX… and I got it to work!

So I want to share my findings, both for my future self, as well as anyone else out there using the new format with OSX.

First off, download the pre-compiled binary that user marekk has generously posted on the Magic Lantern forum from his Dropbox: https://www.dropbox.com/s/497bvdlcsd7p160/mlv_dump.zip

I copied this file into the same directory as my MLV files and unzipped it.

Open a Terminal window and cd into the folder where you have your MLV files (and now mlv_dump).

Drag the (unzipped) mlv_dump file from Finder into the Terminal window and add the following text:

-o outputfilename.RAW -r mlvfilename.MLV


So now you should have something like the following in your Terminal window:

<path for your MLV files>/mlv_dump -o outputfilename.RAW -r mlvfilename.MLV


Of course, replace outputfilename.RAW with whatever name you want to call the RAW file to be generated. And replace mlvfilename.MLV with the name of the MLV file that your camera produced.

Once you hit Enter, it should start processing and you'll get a RAW file. Voila! Continue your workflow from there.

Hope this helps folks to ease the transition to using MLV.

If someone savvier than me with OSX can think of a method to batch process a bunch of MLV files into RAW, please let me know! Leave a comment below, thanks!

Friday, August 2, 2013

Compressing Magic Lantern RAW video Part II


I shot a candlelight test with the Mark 3 (finally got it back from service) and the Mark 2 and decided to test the file sizes again.

Mark 3 footage uncompressed: 100.22GB
Mark 3 footage lossless compressed: 55.82GB (44% reduction in size)
Mark 3 footage loss compressed: 22.63GB (77% reduction in size)

Mark 2 footage uncompressed: 47.15GB
Mark 2 footage lossless compressed: 29.56GB (37% reduction in size)
Mark 2 footage lossy compressed: 16.53GB (65% reduction in size)

Pretty significant savings, even with the lossless compression. Since I haven't finished editing this one, I think I'll keep the lossless compressed around until I finish. Then chuck it and keep just the lossy compressed files.

Above is a frame from the test. Lit purely by candlelight!

Friday, July 12, 2013

Canon 5D High ISO RAW Video

I shot this for a client on Monday, using mostly ISO1600 and sometimes 3200 (the dog in sun was ISO100). The consequence was that I barely had to light it, and I could really run and gun, focusing my attention on content and pulling focus. Some of the footage has been pushed +1.0 to +1.6 stops of exposure in post (ACR) to match brightness levels from clip to clip. The post production cost is higher than shooting H264 though... I estimate for a short video like this, to add 1 to 1.5 days. With my workflow, that's the time to convert raw files to DNGs and adjust them, and also the time at the end to do color corrections and other raw adjustments and re-encode ProRes files.

The lesson learned here, for me, is that I can shoot at ISO1600 with impunity, and probably 3200 too. In post, I couldn't tell them apart. Can't wait to try with the 5D Mark III next to see if it's that much better. These are exciting times indeed. Arri Alexa eat your heart out!


Rare Breed Gourmet Dog Treats from John Ha on Vimeo.